
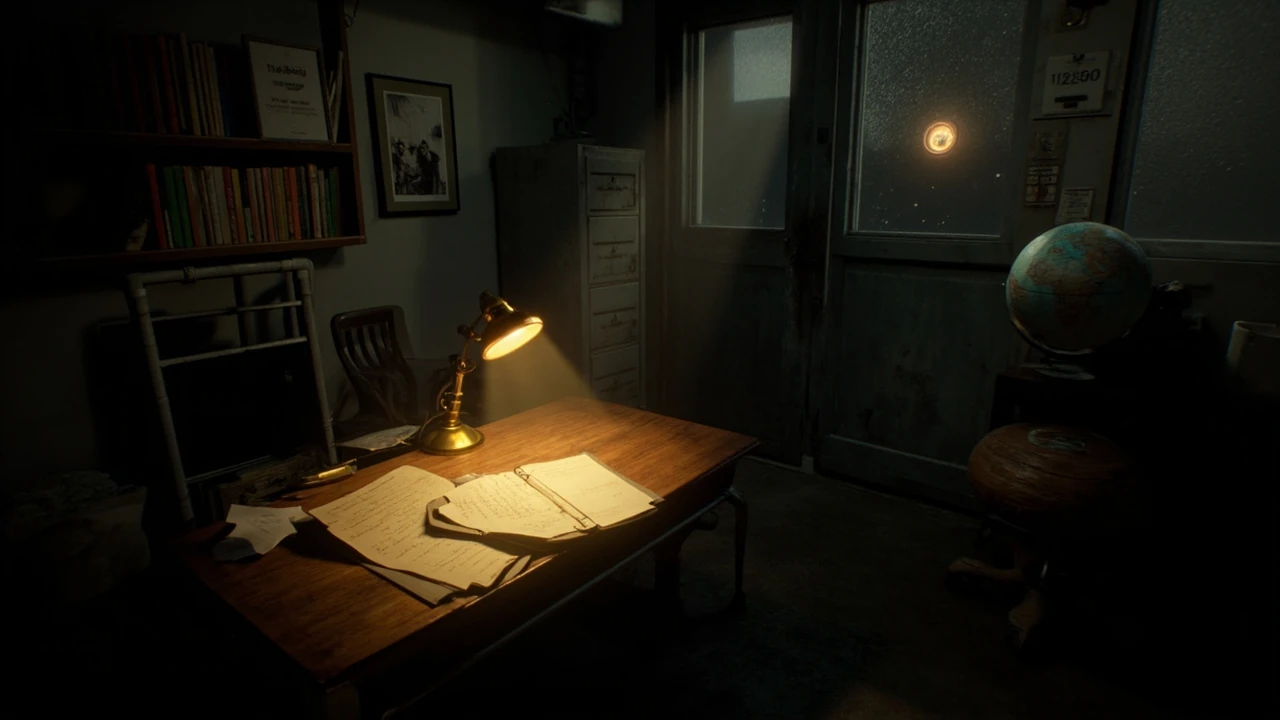
Lead researcher office puzzle RE9: what you actually face in Resident Evil Requiem
The lead researcher office puzzle RE9 is one of the first closed-room sequences in Resident Evil Requiem, and it is the moment the game stops being a corridor walk and starts being a logic problem. The player walks into a senior researcher’s personal office, the door locks behind them, and the only way out is to read the room, combine the right documents, and unlock a safe in the right order. It is short, but it is the section where the design team teaches the player how every later puzzle in the game will be read.
For English-speaking players coming in fresh, the appeal of this section is that it is fair. The room tells the player exactly what it wants, in the right order, without timing pressure. The frustration most people feel here comes from missing the back of a note or from never moving the chair, not from the puzzle being opaque. Once the chain is clear, the rest of the research wing opens up.
The section also does something that is easy to miss on a first run: it teaches reading order rather than reading speed. The clues are not hidden behind dexterity checks, item crafting, or stamina management. They are placed on surfaces a flashlight beam can sweep in a single pass, and the order in which the player picks them up matters more than how fast they click. That choice is deliberate, and it is the reason the lead researcher office puzzle RE9 has become a reference point for how the rest of the institute is laid out.
Where the lead researcher office sits in the game’s structure
The office belongs to Dr. Mara Ellison, the lead virology researcher who runs the wet-lab wing of the Vellichor Institute. It sits on the second floor of the research wing, between the cold-storage archive and the central stairwell that leads to the containment level. From a level design point of view, it is a “thesis room”: a single closed environment that introduces the visual language, the item-density, and the reading logic used across the rest of the building.
Before the player reaches the office, the game has already taught three reading skills: how to inspect a note for a usable number, how to rotate objects in the inventory to read the back, and how to recognise that a static decoration is actually a clue. The lead researcher office puzzle RE9 is where those three skills are tested together for the first time. The room contains nine interactive objects, four of which are red herrings, and the safe combination is the only one that the game flags as a hard fail if the player enters it wrong three times.
The room also acts as a soft checkpoint. The wing around it is loud, the corridor is narrow, and the player usually arrives with a half-empty inventory and a half-charged flashlight. Once the office door closes, the audio mix drops to almost nothing, and the game gives the player a quiet interval before the next scripted encounter. That quiet is not a coincidence: it is the only time in the first act where the game is comfortable letting the player read for as long as they want.
Within the wider campaign, the office is the first room that uses a locked door, a number pad, a safe, and a keycard in the same space. Each of those mechanics shows up in isolation earlier in the game, but this is the first time they are stacked. The reason they are stacked here is so the player can see how a four-mechanic chain behaves before the design team starts hiding individual links behind locked doors in later wings.
Room layout: what is on the desk, wall, and shelf
The office is a single rectangular room roughly six metres by eight metres, with the door on the short west wall. The east wall is a floor-to-ceiling window covered by half-drawn venetian blinds. The north wall holds the bookshelf, the framed qualifications, and the wall-mounted display case for a single preserved specimen jar. The south wall holds the filing cabinet, a low side table, and the side door with the number pad. The desk sits roughly in the middle, angled so the player’s flashlight crosses both the desk surface and the bookshelf when they stand at the door.
The interactive objects and their roles are listed below. Items that contribute to the lead researcher office puzzle RE9 are marked as part of the solution chain.
| Object | Location | Role in the puzzle | First inspection reward |
|---|---|---|---|
| Desk notepad | Centre of the desk | Solution chain | Three-digit hint, order matters |
| Framed photograph | Above the desk, right side | Solution chain | Confirms which notebook is the right one |
| Office notebook (green) | Bookshelf, second row | Solution chain | Final digit of the safe code |
| Office notebook (red) | Bookshelf, third row | Red herring | Background lore only |
| Office notebook (blue) | Bookshelf, top row | Red herring | Reused in a later puzzle |
| Filing cabinet | South wall | Solution chain | Holds the office key once unlocked |
| Locked drawer | Right side of the desk | Solution chain | Holds the side door keycard |
| Specimen jar | Wall display case | Decorative | Reads as a lore note, not a clue |
| Globe | Side table | Decorative | Can be rotated, no mechanical effect |
When the player first walks in, the safe itself is hidden from view. It is built into the wall behind the rolling chair, and the chair has to be moved before the safe becomes interactable. The chair does not give a prompt, so first-time players often leave it for last. The filing cabinet is also non-obvious: the top drawer looks open, but only the bottom drawer has the office key, and it is locked until the desk notepad has been read at least once.
Lighting in the room is mixed. The desk lamp is on a dimmer switch and stays at the same level the entire visit, but the wall-mounted case throws a sharp reflection off the specimen jar that hides the safe for a few seconds the first time the player turns. The blinds are a functional lighting prop: pushing them aside reveals a window looking onto the inner courtyard, which is purely atmospheric but also gives the player a sense of where the office sits in the building.
The acoustic profile of the room is worth noting for players who play with headphones. The desk lamp has a faint electrical hum, the blinds rattle when the player brushes them, and the chair gives a single low creak when it is first pushed. None of those sounds are clues, but they are useful landmarks. On Standard difficulty the player can use them to tell which side of the chair the safe is on without aiming the flashlight directly at the wall.
Step-by-step solution for the lead researcher office puzzle RE9
The puzzle is built as a four-step chain. Each step is gated on the previous one, and there is no alternative path: if the player picks up the wrong notebook first, they will still finish the chain, but they will spend extra inventory slots carrying red-herring items that are only useful later in the game. The cleanest route is the one the level designers intended.
- Pick up the desk notepad and read the back. The visible side is a meeting agenda. The back side, accessed by pressing the rotate button, has a handwritten note that says “order is: 2, then me, then the oldest in the row”. This is the hint for the safe combination order.
- Read the framed photograph above the desk. The photograph shows three researchers, with Dr. Ellison on the left, a junior colleague in the centre, and a visiting postdoc on the right. The photograph is captioned with a year. The year ends in 2, which is the first digit of the safe code.
- Go to the bookshelf and pick the green notebook. The green cover matches the colour of Dr. Ellison’s lab coat in the photograph, which is the only way to confirm it is the right notebook. The first page is a memo with a four-digit number written in the margin. The last digit of that number is the third digit of the safe code.
- Return to the desk, open the locked drawer with the office key found inside the filing cabinet, take the keycard, and use the keycard on the side door’s number pad. The number pad accepts the three-digit safe code in the order “photograph year, middle digit of the notebook memo, last digit of the notebook memo”. Entering the code opens the wall safe behind the chair and reveals the master key needed to leave the wing.
The game does not warn the player that the chair needs to be moved before the safe becomes interactable, so the most common cause of being “stuck” is that the player has the right three digits but cannot find the safe. If the digits are correct and the safe still will not open, the player is almost always looking at the bookshelf instead of behind the chair.
A second common mistake is to enter the digits in the order the player found them, rather than the order the notepad describes. The notepad does not say “first, second, third” in the order it appears on the page. It says “2, then me, then the oldest in the row”, which means the photograph digit goes first, the middle notebook digit goes second, and the last notebook digit goes third. Players who skip the notepad back and try to brute force the order usually end up at the 60-second lockout.
Players who play on Hardcore should be aware that the desk lamp is dimmer than on Standard, which makes the green notebook harder to read against the bookshelf. The fix is to push the chair aside first, use the desk lamp to read the photograph and the notepad, and only then walk to the bookshelf. Reversing the order burns flashlight battery for no benefit.
How the clue hierarchy actually reads
What makes the lead researcher office puzzle RE9 work is the way each clue points to the next one. The notepad does not give numbers; it gives an order. The photograph does not give an order; it gives a single digit. The notebook does not give a single digit; it gives a four-digit string, and only one of those digits is the right one. The side door pad does not accept any number; it accepts the three digits in the order described on the notepad. No single clue is enough on its own, and that is the design intent.
| Clue source | Information type | What the player learns | What the player still has to find |
|---|---|---|---|
| Notepad back | Ordering rule | Which clue goes first, second, third | The three digits themselves |
| Photograph | Single digit | First digit of the safe code | The other two digits and the order |
| Green notebook | Four-digit string | Two usable digits buried in context | Which two digits and which is the last |
| Number pad | Acceptance gate | Confirms whether the chain is correct | Nothing, puzzle is solved or failed |
This is also why the red-herring notebooks stay on the shelf instead of being removed. The game wants the player to learn the habit of comparing colour, caption, and cover before picking something up, because the same habit is required in the cold-storage archive and in the final wing of the institute.
From a design perspective, the clue chain is doing two things at once. It is teaching a reading method, and it is teaching a cost. The player who reads every notebook spends more time in the room but carries less dead weight afterwards. The player who grabs only the green notebook is faster but does not get the colour-matching muscle memory the next room will ask for. The puzzle rewards a specific kind of attention, and it punishes the opposite kind very gently.
It is also worth pointing out that none of the four clues is gated behind a stat check. There is no perception roll, no flashlight battery cost, and no inventory management tax. The chain is gated entirely by what the player chooses to read, in what order, and how carefully. That choice is what the rest of the game’s puzzles will test, and the lead researcher office puzzle RE9 is the first time the test is graded.
Common failure modes and what they actually mean
Most failed runs of the lead researcher office puzzle RE9 fall into one of four patterns. The table below lists each one, the in-game signal the player gets, and the cheapest fix without resetting the room.
| Failure mode | In-game signal | Likely cause | Cheapest fix |
|---|---|---|---|
| Code accepted but safe does not open | Number pad resets, no error message | Player is looking at the bookshelf instead of behind the chair | Push the chair aside and re-enter the code |
| Code rejected, first attempt | Number pad flashes red once | Wrong order from the notepad | Re-read the notepad back, ignore the meeting agenda |
| Code rejected, second attempt | Number pad flashes red twice | Wrong notebook picked from the shelf | Compare cover colour to Dr. Ellison’s lab coat, not to the bookshelf label |
| Code rejected, third attempt | Number pad locks for 60 seconds | Combination is fundamentally wrong | Leave the room, re-enter, and restart the chain from the desk |
The 60-second lockout is the game’s only hard fail. It is there to stop brute force, and it is the reason the puzzle never punishes the player for slow, careful reading. There is no time pressure in the office itself: the door is locked from the outside, and nothing spawns in the room until the player opens the safe.
One failure mode that does not appear in the table but is worth flagging is the “I picked up the blue notebook first” case. The blue notebook reads as a usable clue because it sits at eye level and the spine is unmarked. Players who read it carefully realise it is a lab inventory from a different floor, but the cover has no banner that says “wrong notebook”. The only way to rule it out is to compare it against the photograph, which is why the photograph is on the same wall as the desk. The game is testing whether the player will cross-reference two props in the same room.
Another case is the empty inventory. The side door keycard and the office key are both required to leave the wing. If the player walks into the room with four full inventory slots, the desk notepad rotation will still work, but they will not be able to take the keycard out of the drawer without dropping the notepad. Dropping the notepad is fine, but dropping the green notebook by accident is what usually costs the player the third attempt at the pad.
A third edge case is the orientation of the photograph. The frame is hung so that the year caption is at the bottom-right corner of the print, not centred. Players who only look at the centre of the image miss the year entirely and end up searching the desk for a written date. The frame is angled slightly toward the door on purpose, because the desk lamp hits that corner first when the player aims the flashlight from the doorway.
Finally, players on keyboard and mouse occasionally report that the rotate button for the notepad does not register when the inventory wheel is open. The fix is to close the wheel, then tap rotate twice in quick succession. The second tap is the one that flips to the back. This is a control quirk, not a puzzle gate, and it is documented in the controller legend inside the pause menu.
Why the room is built around reading, not reflexes
From a design perspective, the lead researcher office puzzle RE9 is the moment Resident Evil Requiem declares what kind of game it is. The office is small, it is well lit, and it contains no enemies. Every object on every surface is placed so that the player’s flashlight beam catches at least one clue at a time. The game is asking the player to slow down, to read, and to trust that the next clue is in the same room.
That is also why the room has so many decorative props that do nothing. The globe, the specimen jar, and the red and blue notebooks all exist so that the room feels like a real working office and so that the green notebook feels earned rather than obvious. If every object were a clue, the player would still solve the puzzle, but they would not learn the reading habit the rest of the game is going to demand.
Players who treat the lead researcher office puzzle RE9 as a five-minute task tend to be the same players who later complain that the cold-storage archive is unfair. Players who treat it as a fifteen-minute task, who read every object and rotate every note, tend to clear the rest of the game without asking for a walkthrough. The puzzle is short, but the skill it teaches is the whole game.
It is also worth noting that the room never lies. Every prop that looks interactive is interactive, and every prop that gives a number really does give a number. The puzzle does not ask the player to read between the lines or to guess at developer intent. If the player reads the notepad back, looks at the photograph, and picks the green notebook, the safe opens. The room’s reputation for being “tricky” comes almost entirely from the chair being in the way, not from the chain being hidden.
That clarity is also why the room does not have any audio logs. The institute’s audio log system is used everywhere else in the research wing, but it is deliberately absent from the office. The game wants the player to read the room rather than listen to a recorded briefing, and the absence of audio is part of the teaching method.
Inventory and loadout advice before entering the office
The office is not a combat encounter, but the wing around it is. The player will arrive at the door after fighting through the second-floor corridor, so inventory space is tighter than the room suggests. A useful pre-entry checklist looks like this:
- Carry at most two healing items. The room itself is safe, but the corridor on the way out is not.
- Carry at most one stack of handgun ammo. The side door opens into a long hallway and the first enemy is a single shambler.
- Do not carry the blue notebook from the previous room. It is a red herring here and a real clue in the cold-storage archive later.
- Empty at least one inventory slot before entering. The desk drawer and the safe both yield items, and the player needs room to take them without dropping the keycard.
- If the player is playing on Hardcore, save before opening the side door. The corridor on the other side is a one-way drop into a scripted encounter.
None of this is required to solve the lead researcher office puzzle RE9 itself, but it does affect how cleanly the player can leave the wing afterwards, which is what the game is quietly grading.
One practical note for players who like to hoard: the green notebook can be dropped as soon as the safe is open, because the digits are already written down in the player’s mental note. Dropping it frees a slot for the master key, which is a tall item and takes up more vertical space than a notebook. On Hardcore that single slot is often the difference between leaving the wing with a healing item and leaving it with nothing.
A second practical note is about the flashlight. The office is one of the few rooms in the research wing where the desk lamp is enough to read every clue without aiming the flashlight. Players who arrive with a nearly empty battery should switch the flashlight off at the door, read everything under the lamp, and only switch the flashlight back on when they push the chair aside to find the safe. Doing so leaves enough battery for the corridor on the other side of the side door.
How the puzzle connects to the rest of Resident Evil Requiem
The lead researcher office puzzle RE9 is the first of three reading puzzles in the research wing, and the one that sets the template for the other two. The cold-storage archive uses the same colour-matching trick, the containment level uses the same “one digit in a longer string” trick, and the final wing combines both. Players who clear the office without help will not need help on either of the later puzzles, because the reading pattern is identical.
This is also the puzzle that introduces the master key. The key the player takes from the safe is the same key that opens the door to the wet-lab in the second half of the game, which means a careless player who walks past the office and tries to brute-force the wet-lab later will soft-lock the run. The office is optional in the sense that the player can leave the wing through the central stairwell, but it is mandatory in the sense that the wet-lab is mandatory and the wet-lab requires the master key.
It is also one of the puzzles that the wider Resident Evil Requiem community treats as a benchmark. Speedrunners split the office at the moment the safe opens, and any run under 90 seconds for the chain is considered a clean execution. The reason the office is so popular for splits is that it has no random elements: the photograph is always in the same place, the green notebook is always on the second row, and the chair is always on the same side of the desk. The only variable is the player’s reading order, which is why the same speedrunners also use the office as a teaching example for new runners learning the wing.
For players who care about the wider Resident Evil Requiem story, the office also carries the first real piece of Dr. Ellison’s personal timeline. The framed photograph is dated, the green notebook has a memo about a patient who never came back, and the desk notepad agenda is the meeting at which the patient was discussed. None of that is required to solve the safe, but it is the first time the game trusts the player to read a room as a story instead of as a key.
The puzzle also has a small mechanical legacy inside the rest of the institute. The “rotate the object to read the back” habit that the office forces is the same habit the player needs in the containment level, where the only usable clue is on the back of a laminated badge. Without the office, that badge reads as a piece of set dressing. With the office, the player has already built the reflex to flip it.
What to do if a step in the chain still fails
Players who have read the notepad, looked at the photograph, picked the green notebook, and pushed the chair aside but still cannot open the safe usually have one of three remaining problems. The first is that they are reading the photograph’s year from the wrong corner. The second is that they are taking the four-digit number from the notebook at face value rather than reading the margin where the relevant digit is written in pencil. The third is that they are entering the digits in the order the notebook prints them, rather than the order the notepad describes.
If the chain still fails after those three checks, the cleanest reset is to leave the office through the side door, walk ten paces down the corridor, and re-enter through the main door. Re-entering the room does not reset the inventory, so the player keeps the notepad, the photograph observation, and the green notebook, but it does re-enable the safe prompt if the chair was knocked into a non-standard position during a panic search.
For players who are stuck after the 60-second lockout, the lockout is the only thing that actually needs to run down. The player’s notes are still correct. The lockout is a cooldown, not a failure, and the next entry is treated as the first of three fresh attempts.
Frequently asked questions
Where is the lead researcher office in RE9?
The lead researcher office is on the second floor of the Vellichor Institute’s research wing, between the cold-storage archive and the central stairwell. The door is locked when the player first arrives, and the lock is opened with the staff keycard from the reception desk on the same floor.
Do I have to solve the lead researcher office puzzle to progress?
Yes, if the player wants to reach the wet-lab. The office contains the master key, and the master key is the only way to open the wet-lab door in the second half of the game. The player can leave the wing through the central stairwell without solving the puzzle, but the game will soft-lock at the wet-lab if the master key has not been picked up.
What is the safe code in the lead researcher office?
The safe code is a three-digit combination in the order “last digit of the photograph year, middle digit of the green notebook memo, last digit of the green notebook memo”. The notepad back tells the player this order. The photograph is above the desk and the green notebook is on the second row of the bookshelf.
Why does my code work on the pad but the safe still does not open?
The safe is built into the wall behind the rolling chair, and the chair blocks the interaction prompt until it is pushed aside. Push the chair away from the desk, look at the wall behind it, and re-enter the code on the number pad next to the safe.
Is the lead researcher office puzzle timed?
No. There are no enemies in the room, the door is locked from the outside, and the number pad locks for 60 seconds after three wrong entries but does not otherwise rush the player. The puzzle is designed to be read slowly.
Can I solve the puzzle without reading the notepad back?
Technically yes, if the player already knows the order from a guide. In-game, the notepad back is the only place the order is described, and the notepad front is a meeting agenda that looks like the real clue. The game expects the player to inspect the notepad twice.
Which notebook on the bookshelf is the right one?
The green notebook on the second row. The colour matches Dr. Ellison’s lab coat in the framed photograph, and the memo inside it contains the digits that feed the safe code. The red and blue notebooks are background lore or used in a later puzzle.
What happens if I enter the wrong code three times?
The number pad locks for 60 seconds and the prompt changes to a flashing red icon. After the lockout ends, the pad accepts new entries, but the player does not have to restart the puzzle. The three digits already gathered from the photograph and the notebook are still correct; the only thing that changes is the player’s patience.
Does the lead researcher office puzzle change on higher difficulties?
On Hardcore, the puzzle itself is identical, but the corridor on the other side of the side door becomes a scripted enemy encounter with no healing items in the room. The office is still safe, but the player should save before opening the side door.
Is the lead researcher office puzzle RE9 required for any trophies or achievements?
Yes. The “Thorough Reader” trophy in Resident Evil Requiem requires the player to inspect every interactive object in the lead researcher office, including the red-herring notebooks. The trophy will not unlock if any object is left uninspected, even if the safe code is correct.
“`


Leave a Reply