
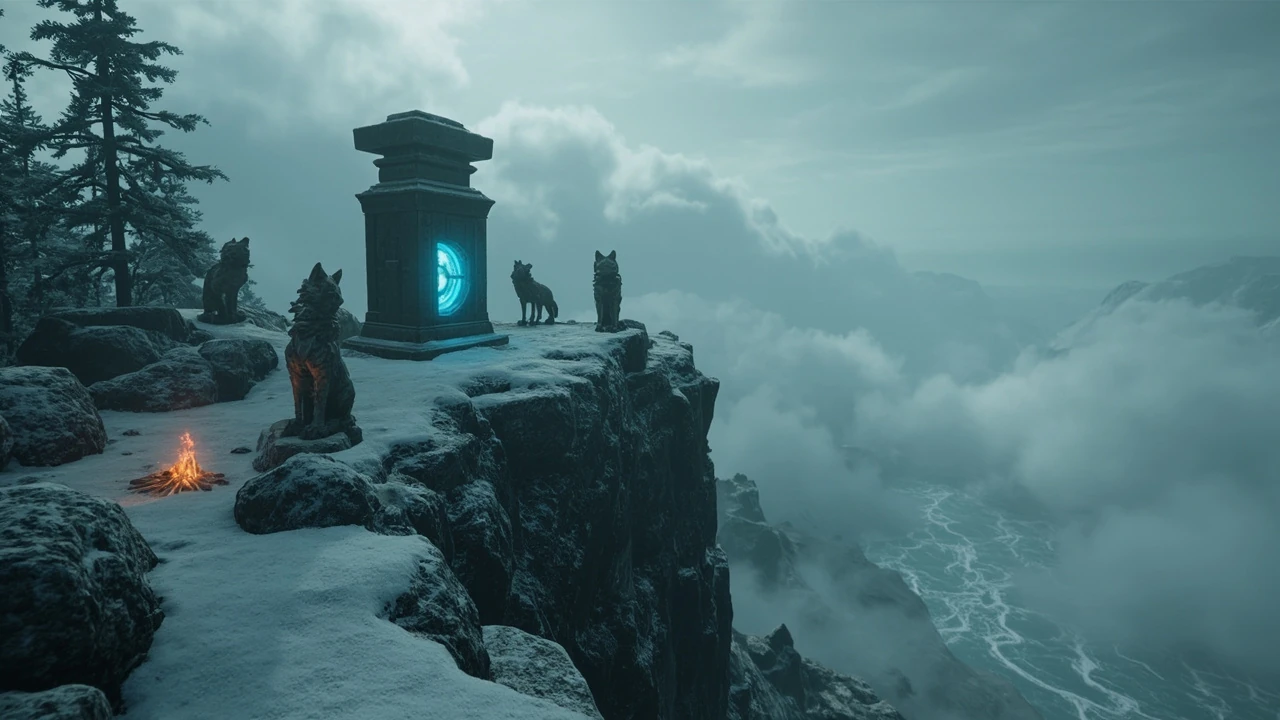
Reliquary of Compassion
The Reliquary of Compassion sits near the top of the Chilled Peak Shrine, the cold-weather climb in Ghost of Yotei that begins on the northwestern border of Teshio Ridge, north of Sarobetsu Lake and west of the Hakodake Mountains. It is one of several Mountain Reliquaries scattered across the Tokachi Range, and solving it is a small but distinct piece of the game’s exploration layer. For developers and players who care about the craft of side content, it is also a tidy case study in how Ghost of Yotei uses a single environmental mechanic, the rotatable wolf statue, to deliver a quiet puzzle, a piece of regional lore, and a permanent combat reward in one short interaction.
This guide explains how to reach the reliquary, how to interpret the in-world inscription, how to rotate the wolf statues into a working solution, and how the puzzle fits into the broader Reliquary system and the Charm of Mount Yotei that powers it. It also pulls out the design lessons worth noticing on the way.
Where the Reliquary of Compassion sits in the game
Reliquaries are a class of optional puzzle objects in Ghost of Yotei tied to specific regions. Each region has its own Mountain Reliquary, and the Reliquary of Compassion is the example attached to Tokachi Range. The game groups them as a system: solving one of them permanently teaches Atsu the Charm of Mount Yotei, a charm that reduces the damage she takes, and each further Reliquary increases the strength of that effect.
That framing matters because it tells a designer exactly what the player is buying for their time. The puzzle itself is short, but the reward is permanent and stackable, so the designer’s job is to make the moment feel worth the climb. Ghost of Yotei answers that challenge by tying the Reliquary of Compassion to a location the player is already likely to visit, the Chilled Peak Shrine, instead of parking it in an out-of-the-way corner of the map.
Reaching the Reliquary of Compassion
You start this climb on the northwestern border of Teshio Ridge, which is the area north of Sarobetsu Lake and west of the Hakodake Mountains. From there the path leads into a colder, higher elevation section of the map that does not exist in the warmer lowland areas. The mountain area has its own rules, and getting them wrong is the most common way the climb slows players down.
Cold does not kill Atsu outright, but it does what the developers at Sucker Punch designed it to do: it limits your visibility. A climb that happens to fall at night with a low body temperature can quickly become a navigation problem rather than a combat problem. Players who try to brute-force the climb in low light often blame the puzzle when the real issue is vision.
Use the campfires. They are the explicit heat source the area offers, and the climb is laid out so that a sensible route will pass near enough of them to keep the Health bar stable. The two practical rules are simple:
- Do not sprint past a campfire if you are cold; the heat refill is more valuable than a few seconds saved.
- Plan a route that hops between visible heat sources instead of a straight line to the shrine.
Halfway through the climb, the path opens into a long gravel slope that carries you down to a wide ice lake. That lake is the visual landmark you are looking for, because the path to the Reliquary of Compassion branches off from it.
Finding the puzzle once you are on the ice lake
When the gravel slope lets you out at the lake, the puzzle does not present itself immediately. The Reliquary of Compassion is not a free-standing monument; the solution page for the Reliquary of Compassion describes it as encountered near the top of the Chilled Peak Shrine, which is what the climb itself is, so the puzzle sits at the end of this section rather than at the bottom.
From the lake, you head left, which is south in world space, toward a large rock formation. A small campfire hides around the corner of that formation. Treat that campfire as the staging point for the rest of the puzzle. The reason is that the puzzle itself is short, but if you are cold, the answer is to warm up first and then walk into the puzzle with full visibility rather than fighting the temperature meter while reading inscriptions and checking statue facing.
Near the campfire, a side path leads under a thick slab of rock hung with icicles. The path slopes upward and ends at a tight gap. Squeezing through that gap drops you into the small enclosed space that holds the Reliquary monument and the wolf statues. The monument is the stone plinth in the center; the statues sit on smaller plinths arranged around it.
Reading the inscription at the Reliquary
Step up to the main monument and interact with it. The inscription that appears is the only piece of in-fiction text the puzzle gives you, and it is short enough to read carefully:
The mountain took pity on the boy with no home
And lit her fire to keep the boy warm
The wolves gathered around, eyes on the mountain’s hearth
That inscription is the entire puzzle brief. The Reliquary of Compassion is asking the player to physically reconstruct the image the poem describes. The mountain is the central monument. The fire is the campfire you just warmed up at. The wolves are the rotatable statues around the monument, and “eyes on the mountain’s hearth” is the key line: each wolf needs to face toward the fire.
Notice what the design is doing here. There is no HUD, no overlay, and no objective marker that says “rotate the statues.” The clue is delivered in the same language and imagery as the rest of Tokachi Range’s environmental storytelling, and the player’s job is to translate prose into a spatial arrangement. That kind of translation is one of the cheapest ways a level designer can make a small puzzle feel earned rather than busywork.
How the wolf statue puzzle works
Each wolf statue is mounted on its own plinth and can be rotated freely. The statues do not animate, do not have a limited number of rotations, and do not give partial feedback, which means the only way to evaluate a configuration is to look at it from the central monument and ask whether the arrangement matches the poem.
The intended reading of “the wolves gathered around, eyes on the mountain’s hearth” is that every statue should be oriented so that its face points toward the campfire that sits at the corner of the rock formation, not toward the central monument. Players often turn the wolves to face the monument first because the monument is the most visually dominant object in the room. That configuration is wrong, and it is the single mistake the inscription is built to prevent.
If you misalign the statues, there is no failure state and no damage. The puzzle simply does not resolve, and the Reliquary stays in its dormant state until you try again. The lack of punishment matters: it tells you that the game’s design assumption is that the player is solving the puzzle for the lore and the reward, not under time pressure.
Resetting the statues without leaving the area
It is common, especially on a first attempt, to spin one or two statues past the right position and lose track of which face is which. The game offers a soft reset that does not require leaving the puzzle room, which is the right call for a puzzle that lives at the end of a long climb. The reset method described by the official solution page is to fast travel anywhere, even to the Reliquary you are currently working on, and the wolves will return to their original positions.
Two practical notes from that mechanic. First, “fast travel anywhere” includes the Reliquary itself, so the reset is essentially free; you do not have to teleport to a different shrine to clean up the puzzle. Second, the reset is built into the fast-travel system rather than tied to a specific item or menu, which is a small but deliberate choice. The designers are signalling that experimentation is part of the puzzle, and they do not want to charge the player for trying a wrong configuration.
Reward for solving the Reliquary of Compassion
Solving the Reliquary of Compassion contributes to the broader Reliquary system rather than granting a one-off item. The permanent reward is the Charm of Mount Yotei, a charm that reduces the damage Atsu takes. The first Reliquary you solve unlocks the charm, and each additional Reliquary you solve increases that effect, so the Reliquary of Compassion is both a goal in itself and a step in a longer progression.
For a player who is only interested in the immediate moment, the practical takeaway is that completing this puzzle turns a small slice of the Tokachi Range from “visited” into “completed.” For a player planning a run, the practical takeaway is that the Charm of Mount Yotei scales with how many Reliquaries you finish, and the Reliquary of Compassion is a reasonable early stop because it lives on top of a shrine you are likely to clear for other reasons anyway.
Reliquary of Compassion vs other Mountain Reliquaries
The Reliquaries share a structure, but each one uses a different spatial reading. Comparing them side by side clarifies what is constant, what varies, and what the Reliquary of Compassion is specifically testing.
| Reliquary | Region | Clue form | Statue target | Notes for players |
|---|---|---|---|---|
| Reliquary of Compassion | Tokachi Range, Chilled Peak Shrine | Three-line poem about wolves and a hearth | Wolves face the campfire, not the monument | End of a cold-weather climb; warm up before solving |
| Reliquary of Resilience | Tokachi Range | Statue-turning puzzle of the same family | Statues face the solution position | First solve unlocks the Charm of Mount Yotei |
| Other regional Reliquaries | Other regions in the game | Regional inscription, regional landmark | Statues oriented to a regional feature | Each further solve increases the charm’s strength |
Three patterns are worth noticing. First, the puzzle is always a translation from a text clue to a physical arrangement, never a logic puzzle with mechanical rules. Second, the “correct” target is always a real environmental feature that already exists in the room, so a careful look around the space will often shortcut the inscription. Third, the reward is shared across the whole Reliquary set, which keeps the per-puzzle reward modest while making the set itself worth collecting.
Common mistakes and how to avoid them
The Reliquary of Compassion has a forgiving failure mode, but a few mistakes reliably cost players time. None of them are bugs; they are the natural byproducts of how the puzzle is built.
- Trying to solve the puzzle while cold. Cold reduces visibility, and visibility is the entire input to this puzzle. Warm up at the campfire under the rock slab before you start reading statues.
- Orienting wolves toward the central monument. The poem says “eyes on the mountain’s hearth,” and the hearth is the campfire, not the stone monument.
- Forgetting that wolves can be rotated freely. There is no cost to spinning a statue through the wrong face, and the fast-travel reset makes experimentation cheap, so a brute-force approach is viable if the inscription is not clicking.
- Assuming the order of wolves matters. The poem describes them as a group around the fire, not as a sequence, so the per-statue rule is shared by all of them.
- Skipping the inscription. Without the poem, the puzzle reduces to a statuary guessing game, which is solvable but feels arbitrary.
Design lessons worth taking from the Reliquary of Compassion
For developers reading the puzzle as a design object rather than a quest, the Reliquary of Compassion is a useful short case in how Ghost of Yotei builds side content. The mechanics are small, the system is shared, and the integration with the world is tight.
Puzzle as translation, not deduction
The Reliquary of Compassion does not ask the player to apply a rule the game teaches. It asks the player to translate a piece of poetry into a spatial arrangement using only what is already in the room. That keeps the cognitive load low, the atmosphere high, and the barrier to entry close to zero, which is exactly the right tradeoff for a puzzle that lives at the end of a long climb.
Reward through accumulation, not singularity
The Charm of Mount Yotei is the same reward across every Reliquary, and its strength scales with how many of them you solve. That is a deliberate system design choice: it lowers the value of any single puzzle and raises the value of the set. Players who care about optimisation are pushed toward solving all of them, and players who do not still get a meaningful first reward from one solve.
Soft failure and free experimentation
There is no penalty for a wrong configuration, and the fast-travel reset is essentially free. That is a small but important signal: the designers want the player to try, fail, and try again without feeling like they are spending resources. The same logic shows up across Ghost of Yotei’s open-world design, where most optional content is opt-in and most failures are reversible.
Environmental integration over standalone arena
The Reliquary of Compassion is not a sealed puzzle box dropped into the world. It is a room that grew out of the cold climb, with a real campfire, a real rock formation, and a real ice lake below. The puzzle uses those features as its answer, which is what makes the moment feel like a discovery instead of an interruption.
Building a route that includes the Reliquary of Compassion
Because the Reliquary of Compassion sits on top of the Chilled Peak Shrine, the most efficient way to include it is to roll it into whatever brings you to that shrine for the first time. The climb itself, the campfire warm-up loop, and the puzzle together take a small slice of time, and the charm upgrade applies to the rest of the run from that point forward.
| Step | Where | What to do | Why it matters |
|---|---|---|---|
| 1 | Northwest border of Teshio Ridge | Begin the cold climb toward Chilled Peak Shrine | Sets the temperature meter in motion |
| 2 | Climb route | Hop between campfires; do not sprint past them | Keeps visibility and the Health bar stable |
| 3 | Ice lake at the end of the gravel slope | Head left (south) toward the rock formation | Locates the hidden campfire under the slab |
| 4 | Side path under the rock slab | Squeeze through the gap at the top | Reaches the Reliquary room |
| 5 | Reliquary monument | Read the three-line inscription carefully | Translates the poem into the statue rule |
| 6 | Wolf statues | Rotate each statue to face the campfire | Solves the puzzle and contributes to the charm |
| 7 | Any time | Fast travel to reset the statues if you misalign them | Cheap experimentation without leaving the puzzle |
The table is also a useful artifact for designers thinking about route density. Each row is a discrete encounter in the room, and each one is small enough to feel like its own beat without breaking the pacing of the larger climb.
How the Reliquary of Compassion fits the wider Tokachi Range loop
Tokachi Range is a cold region with its own vertical structure, and the Reliquary of Compassion is one of the things that justify the climb to its peak. The same loop shows up in other regions with their own Reliquaries, and the shared system is part of what gives Ghost of Yotei’s open world a sense of internal consistency.
For a player, the loop reads as: reach a region, climb to a high point, find a shrine, find a Reliquary attached to that shrine, solve a small spatial puzzle, and walk away with a permanent combat upgrade. For a designer, the loop is a template you can apply elsewhere: pair a vertical traversal challenge with a short, low-stakes puzzle and a reward that scales with how many of them you complete.
What to do if the puzzle still does not click
If you have read the inscription, oriented the statues toward the campfire, and the Reliquary still does not resolve, the first thing to check is if you are in the correct room. The Reliquary of Compassion is the puzzle that sits near the top of the Chilled Peak Shrine, not the puzzle that sits at the lake, and the game contains other Reliquaries that look superficially similar.
If you are in the right room, the second thing to check is whether any statues are facing partially between two positions. The wolf models can look “almost right” when they are actually facing the wrong way by a small angle, and a careful walk around the monument will usually reveal a single misaligned statue. If that does not fix it, use the fast-travel reset and start the rotations from a clean configuration.
Related reading from the studio
Frequently asked questions
Where is the Reliquary of Compassion in Ghost of Yotei?
The Reliquary of Compassion sits near the top of the Chilled Peak Shrine in the Tokachi Range. You reach the shrine by starting a cold-weather climb on the northwestern border of Teshio Ridge, north of Sarobetsu Lake and west of the Hakodake Mountains, and following the path up to the peak.
Do I have to solve the Reliquary of Compassion to progress the story?
No. The Reliquary of Compassion is optional side content tied to the Reliquary system. The story does not require it, but solving Reliquaries contributes to the Charm of Mount Yotei, which reduces the damage Atsu takes, so there is a permanent mechanical benefit for finishing them.
What does the inscription at the Reliquary of Compassion mean?
The inscription is a three-line poem that describes a boy, a fire the mountain lit to keep him warm, and wolves that gathered around the fire. The key line is “the wolves gathered around, eyes on the mountain’s hearth,” which tells the player to orient the wolf statues so they face the campfire rather than the central monument.
How do I reset the wolf statues if I get them wrong?
Fast travel anywhere, including the Reliquary you are currently working on, and the wolf statues will return to their original positions. There is no cost or item required, which makes the puzzle cheap to experiment with.
Does the cold on the climb kill Atsu?
Cold does not kill Atsu outright. It does reduce visibility, especially at night, which is the main way the climb punishes poor route planning. Campfires along the route refill warmth and restore the Health bar, so the safe pattern is to hop between visible campfires instead of running straight to the shrine.
What is the reward for solving the Reliquary of Compassion?
The reward contributes to the Charm of Mount Yotei, a permanent charm that reduces the damage Atsu takes. Your first solved Reliquary unlocks the charm, and each additional Reliquary you solve increases its effect, so the Reliquary of Compassion is one step in a longer progression rather than a one-off item.
Can I solve the Reliquary of Compassion at night?
Yes, but visibility is the main constraint. The cold does not kill Atsu, but it limits how far she can see, and a night-time climb with a cold meter already in the red is hard to navigate. If you do it at night, plan a route that stops at every campfire and warm up fully at the one under the rock slab before reading the inscription.
Is the Reliquary of Compassion a timed puzzle?
No. There is no timer, no combat encounter attached to the puzzle, and no penalty for misaligning the statues. The only cost of a wrong configuration is the time you spend rotating statues and the option to use the fast-travel reset to start over.
How is the Reliquary of Compassion different from the Reliquary of Resilience?
Both are Mountain Reliquaries in the Tokachi Range and both use rotatable wolf statues, but each one is anchored to its own clue. The Reliquary of Resilience is described by the game as the Mountain Reliquary for Tokachi Range that tasks the player with a statue-turning puzzle, while the Reliquary of Compassion is the one attached to the Chilled Peak Shrine and is solved by reading the three-line poem and orienting the wolves toward the campfire. The Reliquary of Resilience is the more general entry point; the Reliquary of Compassion is a more specific, location-driven version of the same idea.
What happens if I leave the area without solving the Reliquary of Compassion?
Nothing. The puzzle stays in its unsolved state and the Reliquary remains available to return to whenever you next visit the Chilled Peak Shrine. There is no fail state, no missed reward timer, and no progression lock tied to the puzzle, so you can leave and come back at any time without losing anything beyond the time you already spent on the climb.

Leave a Reply